MailBlast
A self-hosted bulk email sender with a single-page web UI. Runs on Node.js — no external services required beyond your own SMTP accounts.
Requirements
- Node.js 18 or later
- npm
- One or more SMTP accounts
Installation
cd smtp-sender
npm install
Dependencies: express, nodemailer, better-sqlite3
Starting the server
node server.jsOpen http://localhost:3000 in your browser. Set a custom port with the PORT environment variable:
PORT=8080 node server.jsAdmin account
Set ADMIN_USER and ADMIN_PASS in .env before first run. The admin account is created (or updated) on every startup.
ADMIN_USER=admin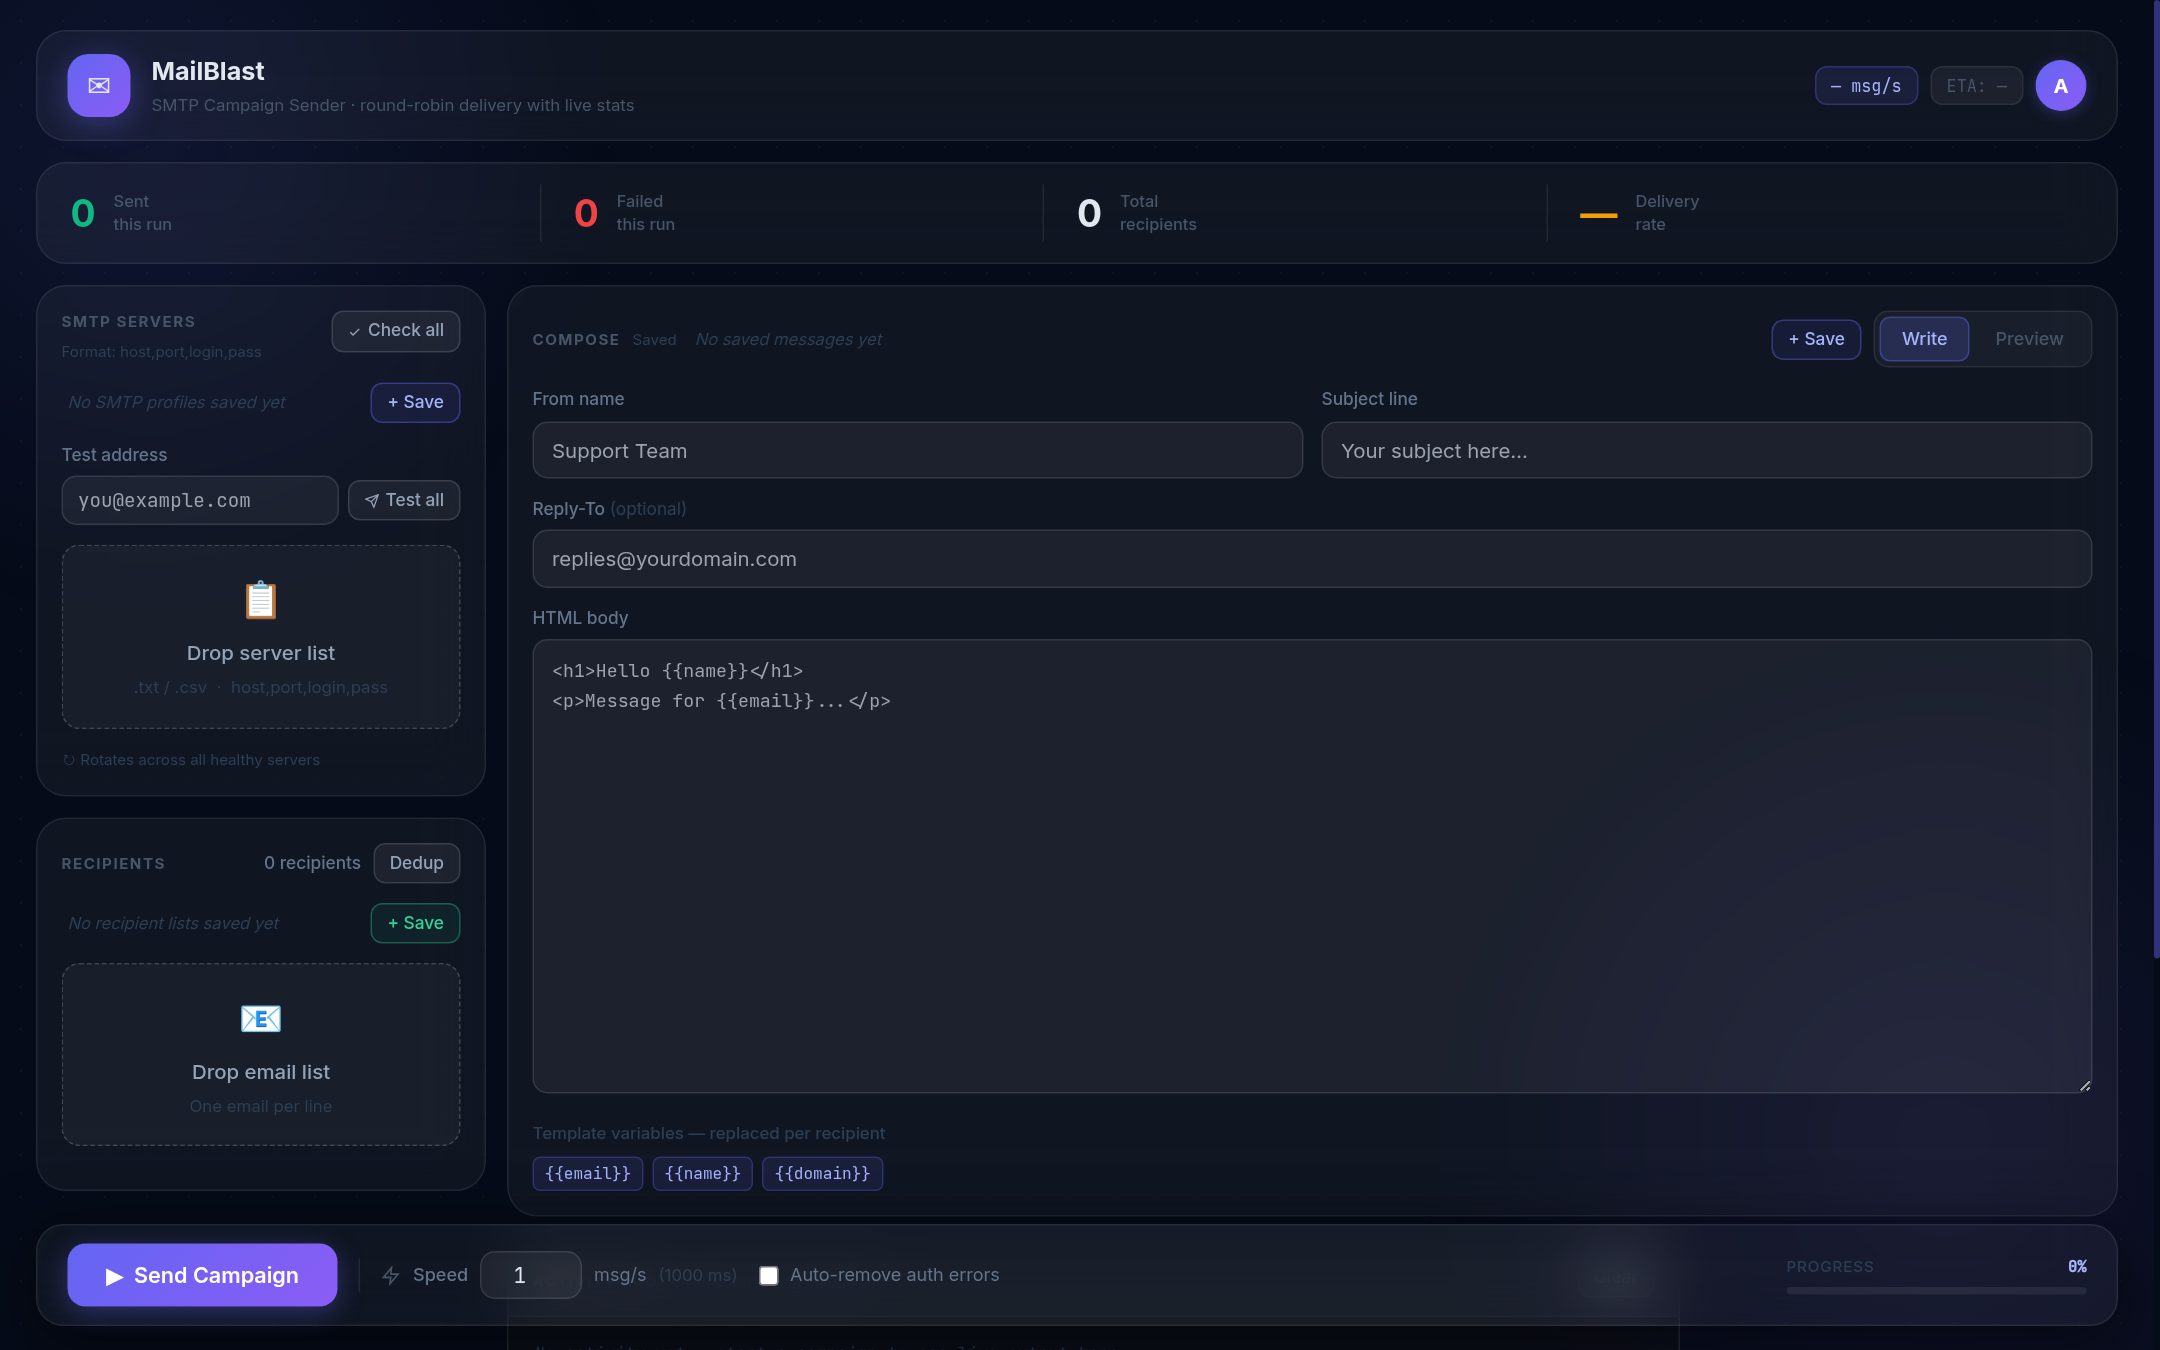
ADMIN_PASS=your-strong-passwordUI Overview
The interface is a single page divided into four areas:
┌─────────────────┬────────────────────────────────┐
│  SMTP Servers   │  Compose                       │
│  Recipients     │  (Write / Preview tabs)        │
├─────────────────┴────────────────────────────────┤
│  Controls bar  (Send · Pause · Stop · Speed)     │
├──────────────────────────────────────────────────┤
│  Live server stats · Activity log · Last sent    │
├──────────────────────────────────────────────────┤
│  History & Stats (collapsible)                   │
└──────────────────────────────────────────────────┘
A ☀ / ☾ theme toggle is available in the header. The avatar circle in the top-right expands into a dropdown with account options, Telegram settings, and user management (admins only).
SMTP Servers
Loading servers
Paste your SMTP credentials into the left textarea or drag-and-drop a .txt / .csv file onto the drop zone. One server per line:
host,port,login,passwordExamples:
smtp.gmail.com,587,user@gmail.com,app-password
mail.privateemail.com,465,sender@domain.com,pass123
smtp.sendgrid.net,587,apikey,SG.xxxxxxxxxxxx465 uses implicit TLS (SMTPS). All other ports use STARTTLS. Duplicates are removed automatically.
Testing servers
| Button | What it does |
|---|---|
| Test all | Sends a test email from every server to the address in the "Test address" field. |
| ▶ (per-row) | Sends a test email from that specific server only. |
| Verify | Checks authentication on all servers without sending email. Marks each ✓ / ✗ / auth-fail. |
After verifying, a Remove bad button appears to strip auth-failed servers in one click.
Recipients
Paste email addresses into the right textarea or drag-and-drop a file. One address per line. Duplicates are removed automatically (case-insensitive).
24-hour dedup check
Click Check dupes to highlight addresses already sent to in the last 24 hours. A Remove dupes button strips them.
Cut & trim
| Button | Action |
|---|---|
| Trim | Removes the first N lines from the textarea. Use this to resume a partial campaign. |
| Save rest as new list | Saves lines N onward as a new named saved list. |
Composing a Message
| Field | Notes |
|---|---|
| From name | Display name shown to recipients. Optional. |
| Reply-To | Address replies go to. Optional. |
| Subject line | Required. Supports template variables. |
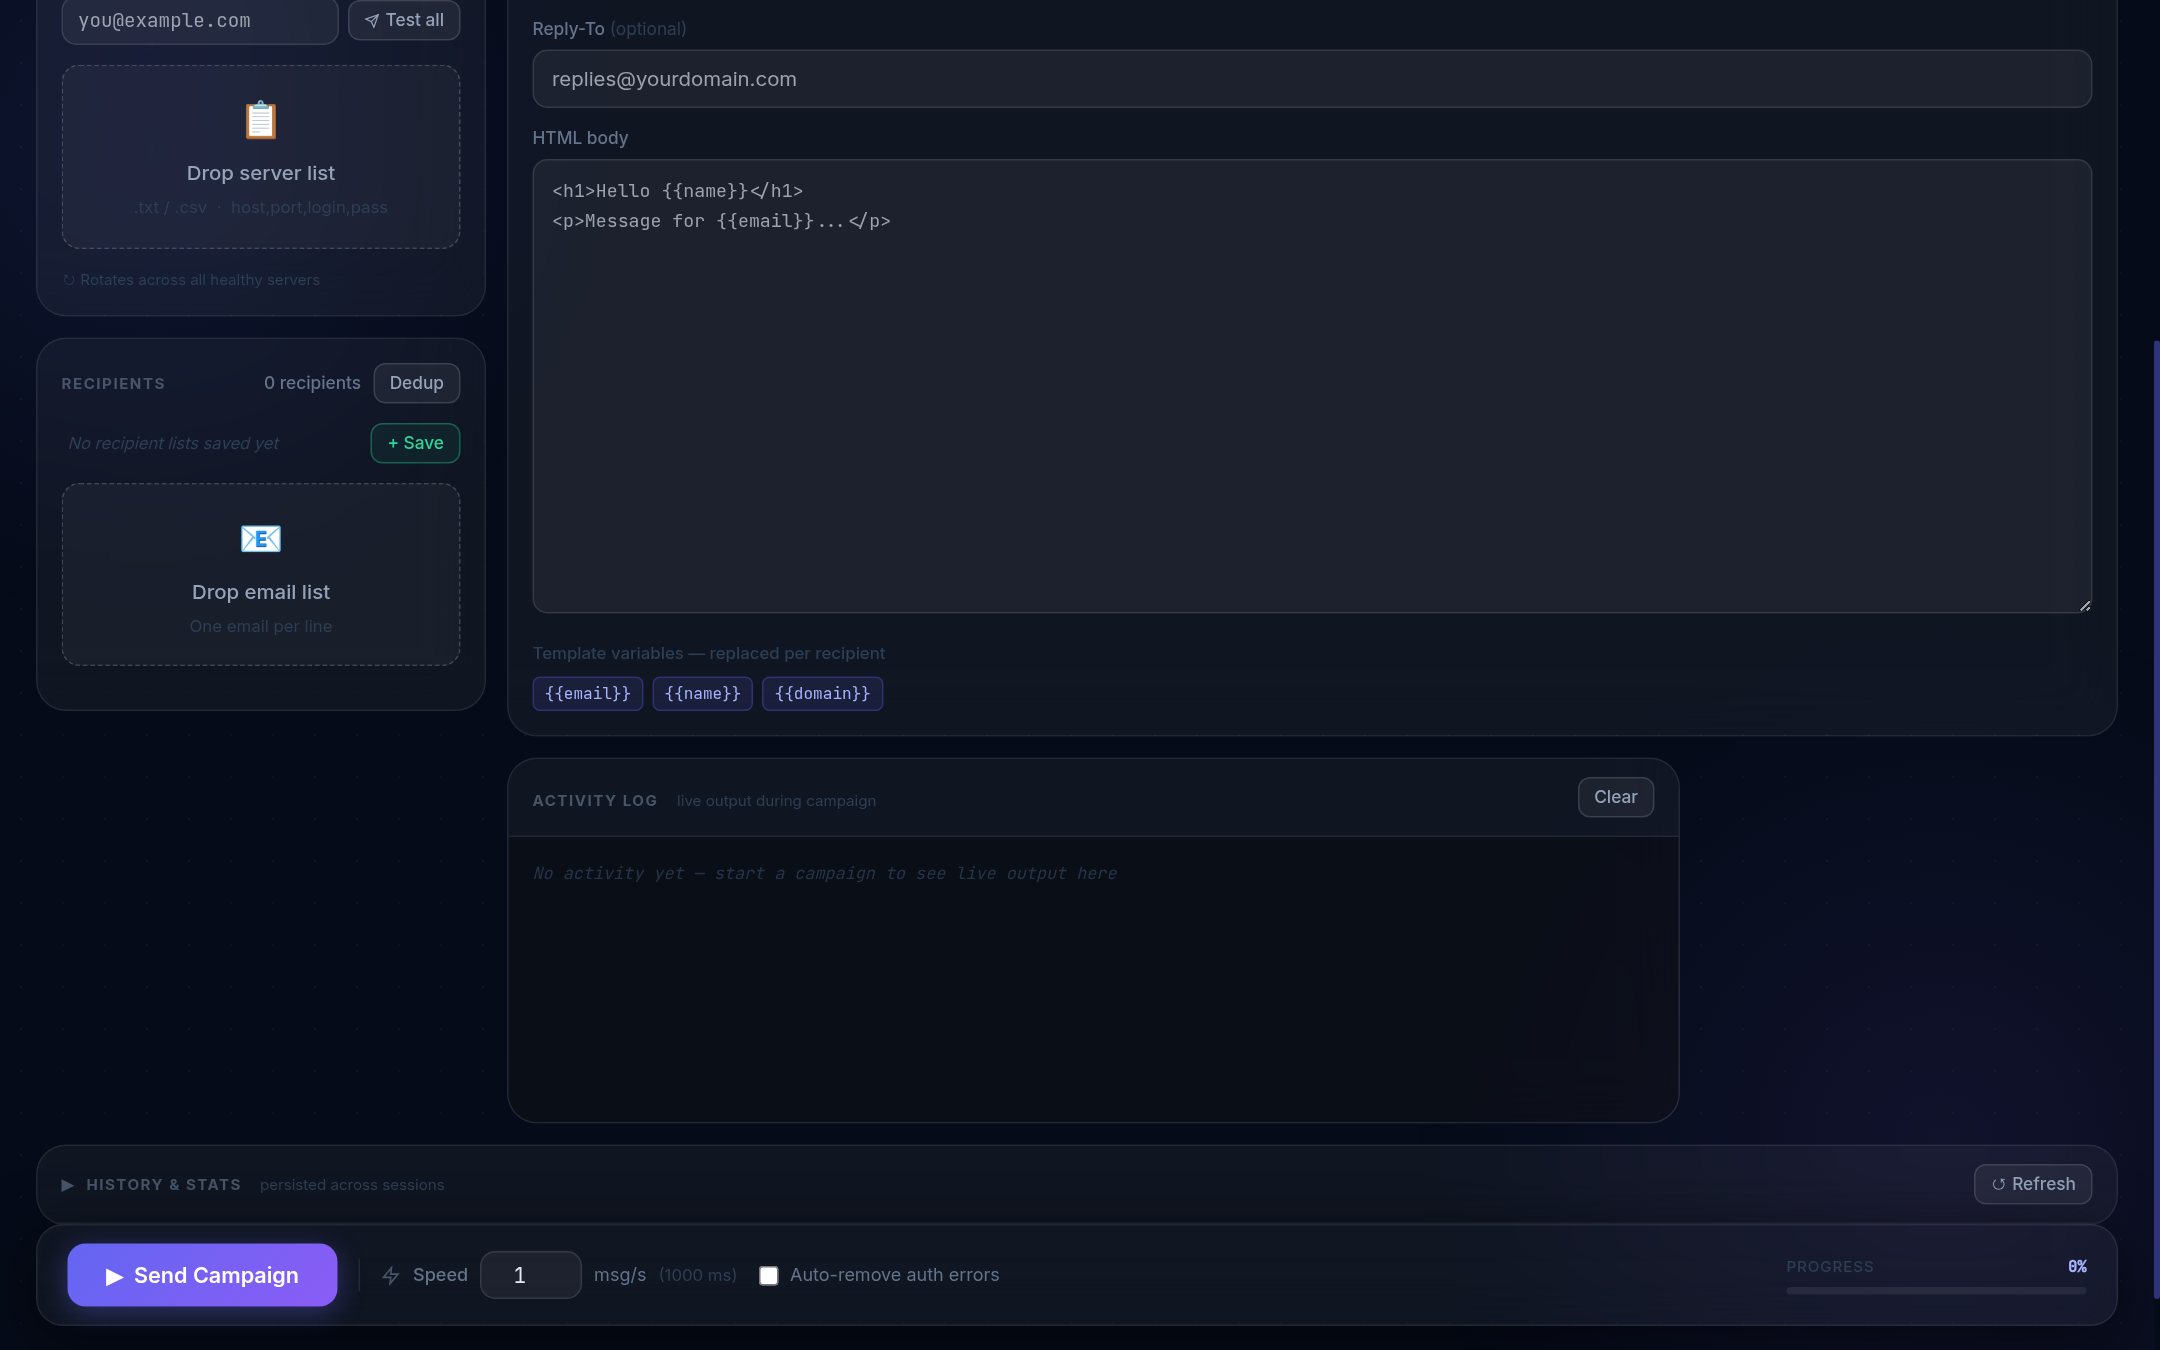
| HTML body | Full HTML email. A plain-text version is auto-generated. |
Template variables
Replaced per recipient at send time:
| Variable | Replaced with |
|---|---|
{{email}} | The full email address |
{{name}} | The part before @ |
{{domain}} | The part after @ |
Example subject: Hey {{name}}, special offer for {{domain}} users
Preview tab
Switch to the Preview tab to render the HTML in an iframe. Enter any test address in the "Preview as email" field to see how variables resolve for that recipient.
Sending a Campaign
- Ensure SMTP servers and recipients are loaded.
- Fill in Subject (required) and optionally From name, Reply-To, and HTML body.
- Set Speed (messages per second). Default: 1 msg/s.
- Optionally enable Auto-remove auth errors.
- Click ▶ Send Campaign.
- A confirmation dialog shows the full summary. Confirm to start.
Controls during a campaign
| Button | Action |
|---|---|
| ⏸ Pause | Pauses after the current email. Click again to resume. |
| ⏹ Stop | Stops after the current email. Campaign is marked as stopped in history. |
Download results
When the campaign finishes, Download sent and Download failed buttons appear. The lists are also saved to the database.
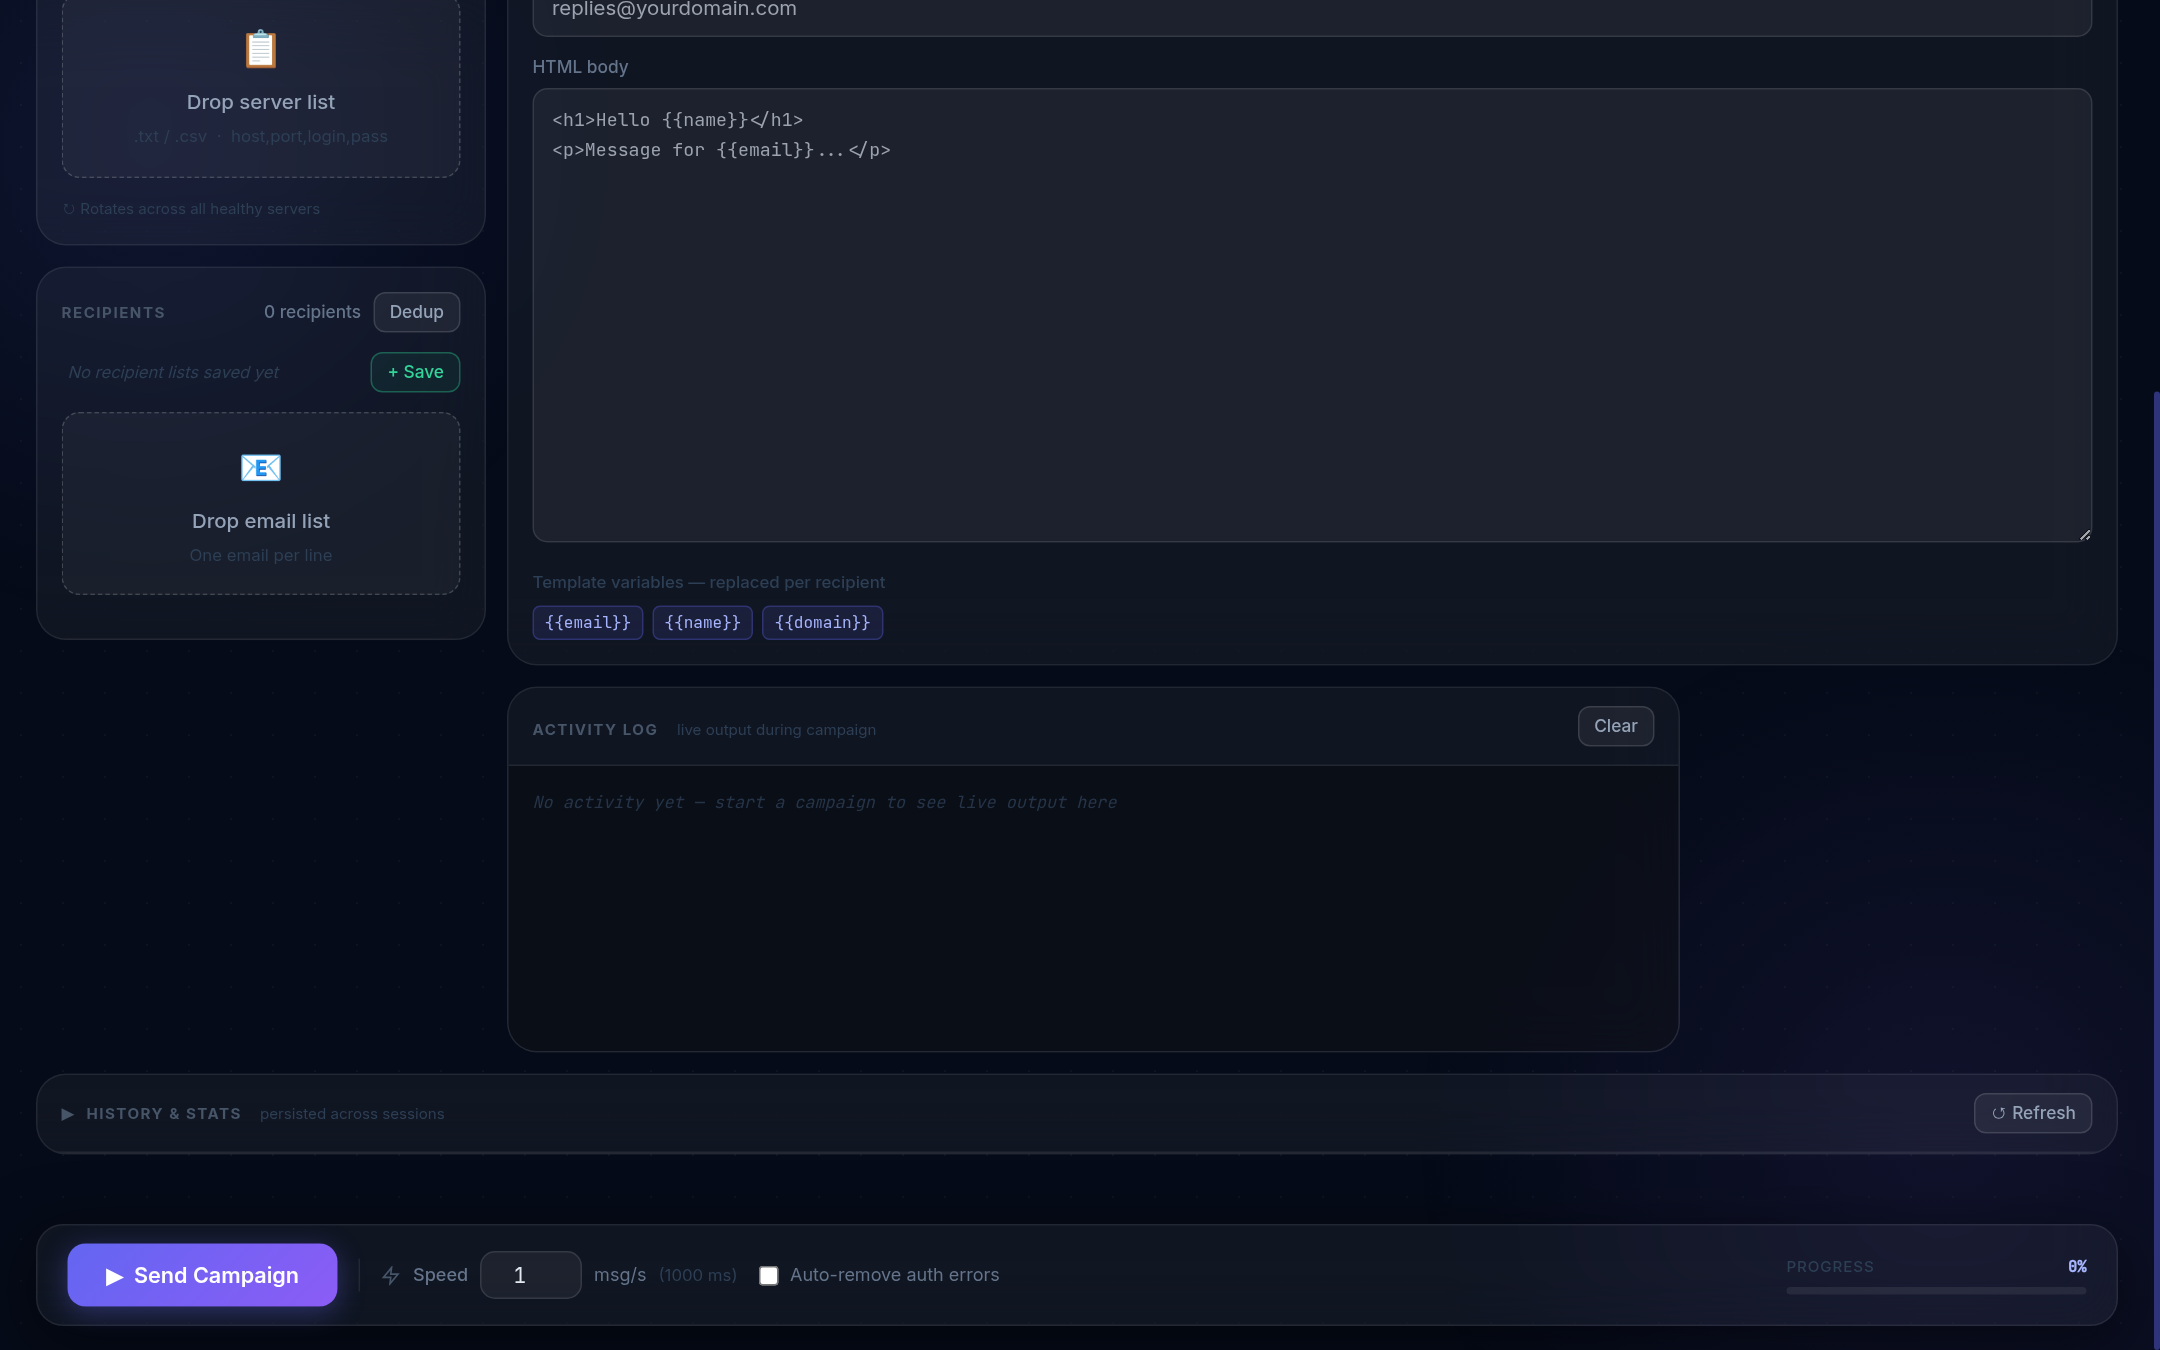
Live Monitoring
The stats strip below the controls shows real-time counts:
- Sent (green) · Failed (red) · Total
- Delivery rate percentage
- Live speed badge (actual messages/second over the last 10 seconds)
- ETA badge (estimated time remaining)
A card for each active SMTP server shows its individual sent/failed counts and delivery rate, updated after every email. The Activity log below is a live timestamped feed of every send attempt and event.
Campaign History
Click ▾ History & Stats to expand the section. Each row shows: Date, Subject, Sent ✓, Failed ✗, Total, Rate %, Duration, Server count.
Click any row to expand it and see the per-server breakdown and action buttons:
- ↺ Load into compose — reloads subject, from name, and reply-to
- ⬇ Sent (N) / ⬇ Failed (N) — download address lists
- 🗑 Delete — removes the campaign from history
Stats charts
- Daily activity — bar chart of sent/failed per day over the last 14 days
- Top servers — horizontal bar chart of all-time sent per SMTP account
Saved Profiles
Three profile strips sit above the SMTP, Recipient, and Message areas. All profiles are persisted in the database and survive restarts.
| Profile type | Stores |
|---|---|
| SMTP profiles | Server list — shows count badge, download, delete |
| Recipient lists | Email list — shows address count, preview first 50, download |
| Message templates | From name + subject + HTML body together |
Click a profile chip to preview its contents before loading.
Telegram Bot Integration
MailBlast can send campaign notifications to a Telegram chat and accept control commands during a running campaign.
Setup
- Create a bot via @BotFather and copy the token.
- Get your chat ID (send a message to the bot, then check
https://api.telegram.org/bot<TOKEN>/getUpdates). - Open the Telegram option from the avatar menu, enter the token and chat ID, and click Test connection.
Notifications
| Event | Default |
|---|---|
| Campaign start | On |
| Progress updates | On (every 25%) |
| Campaign complete | On |
| Server removal errors | Off |
Bot commands
| Command | Description |
|---|---|
/status · /s | Live progress bar, speed, ETA |
/pause | Pause the campaign |
/resume | Resume a paused campaign |
/stop | Stop the campaign |
/stats | All-time statistics |
/help | Command list |
Data & Storage
All data is stored in a SQLite database at data/mailblast.db. Created automatically on first run.
| Table | Stores |
|---|---|
campaigns | Campaign records with subject, counts, timestamps |
campaign_servers | Per-server sent/failed breakdown |
sent_emails | Addresses sent to in the last 7 days (dedup) |
smtp_profiles | Saved SMTP server lists |
message_templates | Saved message templates |
recipient_lists | Saved recipient lists |
users | User accounts with hashed passwords |
telegram_settings | Per-user Telegram token & chat ID |
Retention: sent_emails records older than 7 days are purged on each server start.
# Back up all data
cp data/mailblast.db mailblast-backup.db
SMTP Format Reference
host,port,login,password- Fields are comma-separated, one server per line
- Whitespace around commas is trimmed
- Lines with fewer than 4 fields are ignored
- Port
465→ implicit TLS; all others → STARTTLS - Comments and blank lines are ignored
Common provider examples
# Gmail (requires App Password)
smtp.gmail.com,587,you@gmail.com,xxxx-xxxx-xxxx-xxxx

# Outlook / Hotmail
smtp.office365.com,587,you@outlook.com,yourpassword

# SendGrid
smtp.sendgrid.net,587,apikey,SG.your_api_key_here

# Brevo (formerly Sendinblue)
smtp-relay.brevo.com,587,your@email.com,your_smtp_key

# Private cPanel hosting
mail.yourdomain.com,465,sender@yourdomain.com,password
User Management
MailBlast supports multiple user accounts. Admins can create, manage, and delete users from the Users option in the avatar dropdown (top-right corner).
Roles
| Role | Can do |
|---|---|
| admin | Everything — create users, manage bot config, view purchases, full access |
| user | Send campaigns, manage own profiles, own Telegram settings. Cannot manage other users. |
Creating users
- Open the avatar menu → Users
- Click + New user, enter a username, password, and role
- The user can immediately log in at the same URL
Recovery tokens
Admins can generate a one-time recovery token for any user. The user pastes it on the login screen ("Forgot password? Use recovery token") to set a new password. Tokens expire after 48 hours and can only be used once.
To generate a token: Users → click a user row → Generate recovery token → copy and share the token securely.
Changing your own password
There is no self-service password change in the UI currently. Ask an admin to reset it via the Users panel, or use a recovery token.
Self-Hosting Guide
MailBlast is designed to run on a small VPS or dedicated server. Below are the recommended setups.
VPS requirements
- OS: Ubuntu 22.04 / Debian 12 (or any Linux with Node.js 18+)
- RAM: 512 MB minimum (1 GB recommended for large campaigns)
- Ports: 80/443 open inbound for HTTP/HTTPS; outbound SMTP ports (25, 465, 587)
Running with PM2 (recommended)
PM2 keeps the process alive after crashes and restarts it on reboot.
# Install PM2 globally
npm install -g pm2

# Start MailBlast
cd /var/www/mailer
pm2 start server.js --name mailer

# Save process list and enable startup
pm2 save
pm2 startup
Useful PM2 commands:
pm2 status          # show all processes
pm2 logs mailer     # live log tail
pm2 restart mailer  # apply updated server.js
pm2 stop mailer     # stop the process
Nginx reverse proxy
Place MailBlast behind Nginx so it runs on port 80/443 and you can add HTTPS via Let's Encrypt.
server {
    listen 80;
    server_name mail.yourdomain.com;

    location / {
        proxy_pass         http://127.0.0.1:3100;
        proxy_http_version 1.1;
        proxy_set_header   Upgrade $http_upgrade;
        proxy_set_header   Connection keep-alive;
        proxy_set_header   Host $host;
        proxy_cache_bypass $http_upgrade;

        # Required for SSE (live campaign progress)
        proxy_buffering    off;
        proxy_read_timeout 3600s;
    }
}proxy_buffering off and long proxy_read_timeout are critical — without them the live campaign log won't stream and long campaigns will get cut off.
HTTPS with Let's Encrypt
apt install certbot python3-certbot-nginx
certbot --nginx -d mail.yourdomain.com
Environment variables (.env)
Create a .env file in the project root. Variables are loaded automatically on startup.
# Admin account — created/reset on every startup
ADMIN_USER=admin
ADMIN_PASS=your-strong-password-here

# Optional: change the port (default: 3000)
PORT=3100ADMIN_PASS before exposing the app to the internet. The default value changeme is insecure.
Backups
All data lives in a single SQLite file. Back it up with a simple copy:
# Manual backup
cp data/mailblast.db ~/mailblast-backup-$(date +%F).db

# Automated daily backup via cron
0 3 * * * cp /var/www/mailer/data/mailblast.db /root/backups/mailblast-$(date +\%F).db
Tips & Best Practices
Deliverability
- SPF / DKIM / DMARC — configure these DNS records for your sending domain. Without them, emails will land in spam regardless of content.
- From address — use the same domain as the SMTP login. Mismatched domains hurt deliverability.
- Warm up new SMTP accounts — start with low speed (1–2 msg/s) and small batches. Ramp up over days, not hours.
- Reply-To — always set a valid reply-to address. Many filters flag emails with no reply path.
Speed settings
| Scenario | Recommended speed |
|---|---|
| New / unwarmed SMTP account | 0.5 – 1 msg/s |
| Warmed account, transactional | 2 – 5 msg/s |
| Multiple servers, bulk | 5 – 20 msg/s |
| High-volume (10+ servers) | 20 – 50 msg/s |
Using multiple SMTP servers
MailBlast rotates through servers in round-robin order. Loading 5–10 healthy servers distributes load, reduces per-server send counts, and keeps campaigns running if one server gets rate-limited or blocked. Use Verify before starting any campaign to remove dead credentials.
Resuming a partial campaign
- After stopping, click ⬇ Failed in History to download the failed list.
- Paste it back into the Recipients field.
- Or use the Trim feature: load your original list and trim off the addresses already sent (visible as the "Sent" count in the History row).
Template variable tips
Subject: Hi {{name}}, exclusive deal for {{domain}} users
Body:    Hey {{name}}! We noticed your team at {{domain}} might love...

# With email: john.doe@company.com
# Renders as:
# Subject: Hi john.doe, exclusive deal for company.com users
# Body: Hey john.doe! We noticed your team at company.com might love...{{name}} is the raw part before @. For cleaner names, pre-process your list to use firstname@domain.com format where possible.
Auto-remove auth errors
Enable Auto-remove auth errors in the controls bar before starting. When a server returns an authentication failure (535/534), it's immediately pulled from the pool so the campaign continues uninterrupted on the remaining healthy servers. Failed credentials are logged in the activity feed.
Dedup workflow
MailBlast tracks every address sent to in the last 7 days. Before each campaign:
- Paste your list
- Click Check dupes
- Click Remove dupes to strip recent contacts automatically
This prevents spamming the same contacts across back-to-back campaigns.